Sample data set
The sample data set of this tutorial contains the id of the autonomous communities of Spain (id), its name in spanish (name), the coordinates of their centroids (latitude and longitude) and their population (tot_pop).
import pandas as pd

df = pd.read_csv('https://raw.githubusercontent.com/R-CoderDotCom/data/main/sample_datasets/population_spain.csv', encoding = 'latin-1')
Bubble maps in plotly with scatter_mapbox
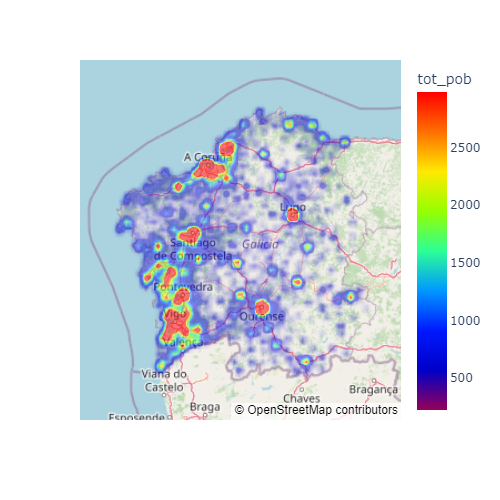
You can create a bubble map in Python with the scatter_mapbox function from plotly express. You will need to set the latitude and longitude of each bubble with lat and lon (as the column names of your data frame) and you will need to assign the numerical variable to be represented to size in order to make the bubbles size proportional to that variable. Note that if you don’t have a Mapbox API token you will need to set a free to use style to mapbox_style. You can also set the level of zoom with zoom, which defaults to 8 and ranges from 0 and 20 or the center point with center, passing a dict of coordinates.
import pandas as pd
import plotly.express as px

# Data with latitude/longitude and values
df = pd.read_csv('https://raw.githubusercontent.com/R-CoderDotCom/data/main/sample_datasets/population_spain.csv', encoding = 'latin-1')

fig = px.scatter_mapbox(df, lat = 'latitude', lon = 'longitude', size = 'tot_pop',
                        zoom = 4, mapbox_style = 'open-street-map')

fig.show()
The default Mapbox style requires an API token in order to work, so you will need to specify any of the styles that not require an API token, which are: 'open-street-map', 'white-bg', 'carto-positron', 'carto-darkmatter', 'stamen-terrain', 'stamen-toner' and 'stamen-watercolor'. If you have a token, you can use the plotly.express.set_mapbox_access_token() function to set it. The styles that require the Mapbox token are named: 'basic' (default), 'streets', 'outdoors', 'light', 'dark', 'satellite' and 'satellite-streets'. Click here to see examples of each free style.
Color by group
You can set a different color for each bubble or group of bubbles by passing the name of a categorical variable to color. In addition, a legend will be created and you will be able to select and unselect the bubbles.
import pandas as pd
import plotly.express as px

# Data with latitude/longitude and values
df = pd.read_csv('https://raw.githubusercontent.com/R-CoderDotCom/data/main/sample_datasets/population_spain.csv', encoding = 'latin-1')

fig = px.scatter_mapbox(df, lat = 'latitude', lon = 'longitude', size = 'tot_pop',
                        color = 'tot_pop',
                        zoom = 3, mapbox_style = 'open-street-map')
# fig.write_image("static/en/plotly/bubble-map-plotly.png", width = 500, height = 500)
fig.show()
Color based on a numerical variable
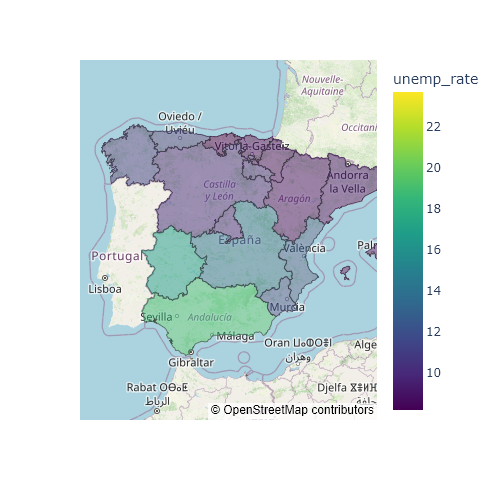
You can also assign the color argument to a numerical variable. In this scenario, each bubble will be colored based on the values of that variable. You can customize the color palette with color_continuous_scale.
import pandas as pd
import plotly.express as px

# Data with latitude/longitude and values
df = pd.read_csv('https://raw.githubusercontent.com/R-CoderDotCom/data/main/sample_datasets/population_spain.csv', encoding = 'latin-1')

fig = px.scatter_mapbox(df, lat = 'latitude', lon = 'longitude', size = 'tot_pop',
                        color = 'tot_pop', color_continuous_scale = 'plasma',
                        zoom = 3, mapbox_style = 'open-street-map')
# fig.write_image("static/en/plotly/bubble-map-plotly.png", width = 500, height = 500)
fig.show()
Maximum size of the bubbles
The default maximum size of the bubbles is 20, but if you consider the bubbles are too big or too small for your map you can override that value with the size_max argument.
import pandas as pd
import plotly.express as px

# Data with latitude/longitude and values
df = pd.read_csv('https://raw.githubusercontent.com/R-CoderDotCom/data/main/sample_datasets/population_spain.csv', encoding = 'latin-1')

fig = px.scatter_mapbox(df, lat = 'latitude', lon = 'longitude', size = 'tot_pop',
                        size_max = 30,
                        zoom = 4, mapbox_style = 'open-street-map')
# fig.write_image("static/en/plotly/bubble-map-plotly.png", width = 500, height = 500)
fig.show()
Text on hover
If you hover over each bubble you will see the coordinates and the corresponding population. However, you can pass the name of a categorical variable to text in order to display a new label on the plot. In the following example we are passing the name in spanish of each autonomous community of Spain.
import pandas as pd
import plotly.express as px

# Data with latitude/longitude and values
df = pd.read_csv('https://raw.githubusercontent.com/R-CoderDotCom/data/main/sample_datasets/population_spain.csv', encoding = 'latin-1')

fig = px.scatter_mapbox(df, lat = 'latitude', lon = 'longitude', size = 'tot_pop',
                        text = 'name',
                        zoom = 4, mapbox_style = 'open-street-map')
# fig.write_image("static/en/plotly/bubble-map-plotly.png", width = 500, height = 500)
fig.show()
Color and opacity
You can input a color as an array to the color_discrete_sequence argument in order to customize the default color of the bubbles. If you have the bubbles colored by group you can pass a list with as many colors as groups or use the color_discrete_map argument to specify the desired color for each group. In addition, you can customize the opacity of the bubbles with opacity.
import pandas as pd
import plotly.express as px

# Data with latitude/longitude and values
df = pd.read_csv('https://raw.githubusercontent.com/R-CoderDotCom/data/main/sample_datasets/population_spain.csv', encoding = 'latin-1')

fig = px.scatter_mapbox(df, lat = 'latitude', lon = 'longitude', size = 'tot_pop',
                        color_discrete_sequence = ['red'], opacity = 0.25,
                        zoom = 4, mapbox_style = 'open-street-map')
# fig.write_image("static/en/plotly/bubble-map-plotly.png", width = 500, height = 500)
fig.show()
Map style
As pointed out before, there are several Mapbox styles available, but some requires a Mapbox API token while others don’t. The style can be customized with mapbox_style and you can check examples for the free styles clicking here.
import pandas as pd
import plotly.express as px

# Data with latitude/longitude and values
df = pd.read_csv('https://raw.githubusercontent.com/R-CoderDotCom/data/main/sample_datasets/population_spain.csv', encoding = 'latin-1')

fig = px.scatter_mapbox(df, lat = 'latitude', lon = 'longitude', size = 'tot_pop',
                        zoom = 4, mapbox_style = 'carto-positron')
# fig.write_image("static/en/plotly/bubble-map-plotly.png", width = 500, height = 500)
fig.show()
Bubble maps in plotly with scatter_geo
An alternative function to the previous is scatter_geo, which doesn’t depend on Mapbox in order to work. Both functions are very similar and many arguments are the same, but they have some differences.
The first difference is the scope, which defaults to 'world' and your selection will depend on your data. Other options are 'usa', 'europe', 'asia', 'africa', 'north america' and 'south america'. In the following example we are setting the scope to 'europe' as the data is only from Spain. Note that in order to set the zoom level with this function you will need to use projection_scale as in the example below.
import pandas as pd
import plotly.express as px

# Data with latitude/longitude and values
df = pd.read_csv('https://raw.githubusercontent.com/R-CoderDotCom/data/main/sample_datasets/population_spain.csv', encoding = 'latin-1')

fig = px.scatter_geo(df, lat = 'latitude', lon = 'longitude', size = 'tot_pop',
                     scope = 'europe', center = {'lon': -3.72, 'lat': 40})
fig.update_layout(autosize = True, geo = dict(projection_scale = 6))

fig.show()
Symbols
Other difference is that you can set a different symbol mark based on a categorical variable with symbol. You can also override the default symbol with symbol_sequence or with symbol_map to specify a symbol for each group.
import pandas as pd
import plotly.express as px

# Data with latitude/longitude and values
df = pd.read_csv('https://raw.githubusercontent.com/R-CoderDotCom/data/main/sample_datasets/population_spain.csv', encoding = 'latin-1')

fig = px.scatter_geo(df, lat = 'latitude', lon = 'longitude', size = 'tot_pop',
                     scope = 'europe', center = {'lon': -3.72, 'lat': 40},
                     symbol = 'name')
fig.update_layout(autosize = True, geo = dict(projection_scale = 6))

fig.show()
Projection
The last important difference is that you can set a projection. Possible options are 'equirectangular', 'mercator', 'orthographic', 'natural earth', 'kavrayskiy7', 'miller', 'robinson', 'eckert4', 'azimuthal equal area', 'azimuthal equidistant', 'conic equal area', 'conic conformal', 'conic equidistant', 'gnomonic', 'stereographic', 'mollweide', 'hammer', 'transverse mercator', 'albers usa', 'winkel tripel', 'aitoff' and 'sinusoidal'. The default depends on the selected scope.
import pandas as pd
import plotly.express as px

# Data with latitude/longitude and values
df = pd.read_csv('https://raw.githubusercontent.com/R-CoderDotCom/data/main/sample_datasets/population_spain.csv', encoding = 'latin-1')

fig = px.scatter_geo(df, lat = 'latitude', lon = 'longitude', size = 'tot_pop',
                     scope = 'europe', center = {'lon': -3.72, 'lat': 40},
                     projection = 'natural earth')
fig.update_layout(autosize = True, geo = dict(projection_scale = 6))

fig.show()